Key takeaways
- Restart your computer.
- During the initial boot-up screen (usually showing the motherboard manufacturer’s logo), repeatedly press a specific key. The most common keys are DEL, F2, F10, or F12.
- Watch the screen carefully as it often displays a message like “Press DEL to enter Setup” or “Press F2 for BIOS.”
- If you miss the window, your computer will boot into Windows. Simply restart and try again.
What's inside
You’ve just invested in a powerful gaming rig, complete with some blazing-fast RAM. But did you know that by default, your RAM might not be running at its full potential? Motherboards typically run RAM at a baseline JEDEC speed, which is significantly slower than the advertised speeds that make those high-end kits so appealing. For gamers and performance enthusiasts, unlocking the true speed of your memory modules through XMP or EXPO profiles is a crucial step to maximizing your system’s responsiveness and frame rates. This guide will walk you through enabling these profiles, ensuring you get every bit of performance out of your RAM.
Whether you’re rocking an Intel or AMD platform, there’s a standardized way to achieve these higher speeds: Intel Extreme Memory Profile (XMP) and AMD Extended Profiles for Overclocking (EXPO). While the names differ, the concept is identical – pre-configured, stable overclocking settings stored directly on your RAM modules that your motherboard can easily apply. Let’s dive into how to activate them.
As an Amazon Associate we earn from qualifying purchases.


⚡ Save on Your Next PC — Amazon Prime
Prime members get fast free shipping on the systems above, plus early access to Prime Day & Black Friday PC deals. New members get a 30-day free trial.
Watch: How to Enable XMP / EXPO for Faster RAM — Video Review
What are XMP and EXPO Profiles?
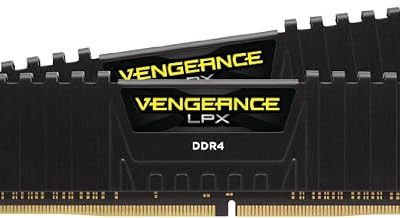
XMP (Intel Extreme Memory Profile) and EXPO (AMD Extended Profiles for Overclocking) are essentially pre-set performance profiles embedded within your RAM modules. Think of them as factory-tuned overclocking settings. When you purchase high-performance DDR4 or DDR5 RAM, such as the G.SKILL Trident Z5 Neo RGB Series DDR5 RAM (AMD EXPO) 64GB (2x32GB) 6000MT/s CL30-40-40-96 1.40V, or even popular options like Corsair Vengeance RGB RS DDR5 16GB (2 x 8GB) or CORSAIR Vengeance DDR5 32GB (2 x 16GB), the advertised speeds (e.g., 6000MHz) are achievable through these profiles, not the default JEDEC standard (often around 3200MHz or 4800MHz). Enabling XMP/EXPO allows your motherboard to read these profiles and configure the RAM’s frequency, timings, and voltage accordingly, unlocking its advertised performance without manual tweaking.
How to Access Your Motherboard’s BIOS/UEFI
The first step to enabling XMP or EXPO is to access your motherboard’s BIOS (Basic Input/Output System) or UEFI (Unified Extensible Firmware Interface) – the firmware that controls your hardware before your operating system loads. The method for entering the BIOS varies slightly between manufacturers but is generally consistent:
- Restart your computer.
- During the initial boot-up screen (usually showing the motherboard manufacturer’s logo), repeatedly press a specific key. The most common keys are DEL, F2, F10, or F12.
- Watch the screen carefully as it often displays a message like “Press DEL to enter Setup” or “Press F2 for BIOS.”
- If you miss the window, your computer will boot into Windows. Simply restart and try again.
Once inside the BIOS/UEFI, the interface can look intimidating, but navigating to the memory settings is usually straightforward.
Locating and Enabling XMP/EXPO
The exact location of the XMP/EXPO settings can differ depending on your motherboard manufacturer (ASUS, Gigabyte, MSI, ASRock, etc.) and the specific BIOS version. However, it’s almost always found within the “Overclocking,” “Advanced,” or “Ai Tweaker” sections.
- Navigate to the Memory Settings: Look for options labeled “Memory,” “DRAM Settings,” “Extreme Memory Profile (XMP),” or “AMD EXPO.”
- Enable the Profile: Once you find the XMP/EXPO option, you’ll typically see a dropdown menu or a toggle. Select the highest available profile that matches your RAM’s advertised speed. For example, if you have 6000MHz RAM, you’ll want to select the 6000MHz XMP/EXPO profile.
- Save and Exit: After enabling the profile, be sure to save your changes. This is usually done by navigating to the “Save & Exit” section and selecting “Save Changes and Reset” or a similar option. The key for this is often F10.
Your computer will then restart. When it boots back into Windows, your RAM should now be running at its advertised speed.
Verifying Your RAM Speed
After enabling XMP/EXPO and rebooting, it’s essential to verify that your RAM is indeed running at the correct speed. This confirms that the profile was applied successfully and your system is performing as expected.
- Task Manager (Windows): Press Ctrl + Shift + Esc to open Task Manager. Go to the “Performance” tab, then click on “Memory.” You should see the speed displayed here.
- CPU-Z: Download and run the free utility CPU-Z. Under the “Memory” tab, you’ll find the “DRAM Frequency.” Note that this will show half the actual clock speed for DDR (Double Data Rate) memory. Multiply this number by two to get the effective clock speed (e.g., if CPU-Z shows 3000MHz, your RAM is running at 6000MHz).
- HWiNFO64: This is a more comprehensive system information tool. Under the “Memory” section, you can find detailed information, including the effective clock speed.
If the speed displayed matches your RAM’s advertised speed, congratulations, you’ve successfully unlocked its full potential!
Tips for Enabling XMP/EXPO
- Check Motherboard Compatibility: Always ensure your motherboard supports the RAM speed you’re trying to achieve. Check your motherboard’s specifications or QVL (Qualified Vendor List) for validated RAM kits.
- Update BIOS: If you encounter issues or don’t see the XMP/EXPO option, consider updating your motherboard’s BIOS to the latest version. This can improve compatibility and stability.
- One Profile at a Time: If you have multiple RAM sticks, ensure you’re enabling the profile for the correct kit. Usually, there’s only one relevant XMP/EXPO option.
- Stability: While XMP/EXPO profiles are designed for stability, in rare cases, you might experience instability if your CPU’s memory controller isn’t perfectly capable of handling the speed. If this happens, try a slightly lower speed profile or consult your motherboard manual for manual tuning options.
Frequently Asked Questions
What’s the difference between XMP and EXPO?
XMP is Intel’s technology, and EXPO is AMD’s. Both serve the same purpose: providing pre-configured overclocking profiles for RAM. EXPO is specifically designed to be more compatible with AMD platforms and often includes additional features for Ryzen processors, such as optimized FCLK (Fabric Clock) ratios.
Will enabling XMP/EXPO void my warranty?
Typically, enabling XMP/EXPO is considered a standard user function and should not void your RAM or motherboard warranty. These profiles are designed to run the hardware within its rated specifications. However, extreme manual overclocking beyond these profiles could potentially impact warranties.
Is it safe to enable XMP/EXPO?
Yes, it is generally safe. XMP/EXPO profiles are tested and validated by RAM manufacturers to ensure stability at their advertised speeds. Your motherboard’s BIOS is designed to interpret and apply these profiles correctly.
My PC won’t boot after enabling XMP/EXPO. What should I do?
If your system fails to boot, you’ll need to clear your CMOS (Complementary Metal-Oxide-Semiconductor). This resets your BIOS settings to their defaults. Consult your motherboard manual for the specific method (usually involving a jumper or removing the CMOS battery for a short period).
Conclusion
Unlocking the full potential of your RAM through XMP or EXPO is one of the simplest yet most impactful performance upgrades you can make to your gaming PC. By following these steps, you can ensure your memory modules are running at their advertised speeds, leading to smoother gameplay, faster load times, and a more responsive overall system. Don’t leave performance on the table – enable XMP/EXPO and experience your rig at its best.