Key takeaways
- Gather Your Supplies: You’ll need your chosen thermal paste (popular options include Thermal Grizzly Kryonaut or Noctua NT-H1), isopropyl alcohol (90% or higher), lint-free cloths or coffee filters, and a soft brush or cotton swabs for cleaning.
- Power Down and Unplug: Always ensure your PC is completely shut down and unplugged from the wall. Ground yourself by touching a metal part of the PC case to discharge any static electricity.
- Remove the Cooler: Carefully detach your CPU cooler according to its manufacturer’s instructions. This usually involves unscrewing or releasing mounting brackets.
- Clean Old Paste: Apply a small amount of isopropyl alcohol to a lint-free cloth or coffee filter. Gently wipe away all traces of the old thermal paste from both the CPU’s Integrated Heat Spreader (IHS) and the cooler’s base plate. You may need to repeat this process a few times until both surfaces are completely clean and shiny. Avoid touching the cleaned surfaces with your bare fingers, as oils can interfere with the new paste’s performance.
Keeping your gaming rig cool is paramount for consistent performance, especially when pushing your hardware to its limits during intense gaming sessions. The CPU and GPU generate a tremendous amount of heat, and efficient heat transfer is crucial to prevent thermal throttling and ensure longevity. While your cooler’s heatsink does the heavy lifting, the often-overlooked thermal paste is the critical interface that bridges the gap between your processor and its cooling solution. Applying it correctly is not just about good practice; it’s a fundamental step in maintaining optimal temperatures.
This guide will walk you through the essential steps of applying thermal paste like a seasoned pro. We’ll cover everything from preparing your components to choosing the right application method and understanding common pitfalls. By the end of this, you’ll be armed with the knowledge to ensure your CPU and GPU are running as cool and efficiently as possible. Let’s get your rig dialed in for peak gaming performance in 2026!
Our top picks




As an Amazon Associate we earn from qualifying purchases at no extra cost to you. Ratings are shown as listed on Amazon.
⚡ Save on Your Next PC — Amazon Prime
Prime members get fast free shipping on the systems above, plus early access to Prime Day & Black Friday PC deals. New members get a 30-day free trial.
Watch: How to Apply Thermal Paste Correctly — Video Review
Why Thermal Paste Matters
Thermal paste, also known as thermal compound or thermal grease, is a conductive material that fills microscopic imperfections and air gaps between the surface of a CPU (or GPU) and the base plate of its cooler. These air gaps are terrible insulators, hindering heat transfer. Thermal paste, with its high thermal conductivity (often measured in W/mK), effectively displaces this air, creating a much more efficient pathway for heat to move from your processor to the heatsink, where it can then be dissipated by the cooler’s fan(s).
Preparation is Key
Before you even think about applying new paste, thorough preparation is vital. This ensures a clean surface for optimal adhesion and heat transfer.
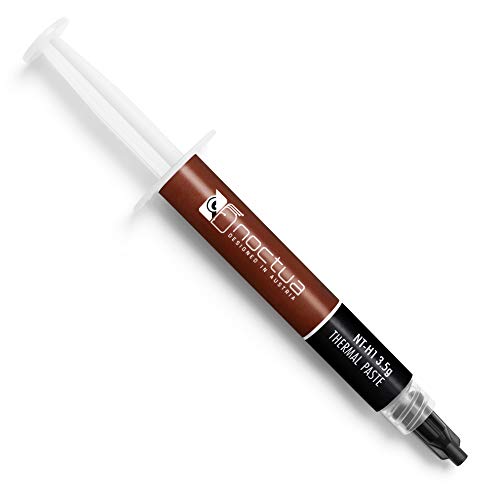
- Gather Your Supplies: You’ll need your chosen thermal paste (popular options include Thermal Grizzly Kryonaut or Noctua NT-H1), isopropyl alcohol (90% or higher), lint-free cloths or coffee filters, and a soft brush or cotton swabs for cleaning.
- Power Down and Unplug: Always ensure your PC is completely shut down and unplugged from the wall. Ground yourself by touching a metal part of the PC case to discharge any static electricity.
- Remove the Cooler: Carefully detach your CPU cooler according to its manufacturer’s instructions. This usually involves unscrewing or releasing mounting brackets.
- Clean Old Paste: Apply a small amount of isopropyl alcohol to a lint-free cloth or coffee filter. Gently wipe away all traces of the old thermal paste from both the CPU’s Integrated Heat Spreader (IHS) and the cooler’s base plate. You may need to repeat this process a few times until both surfaces are completely clean and shiny. Avoid touching the cleaned surfaces with your bare fingers, as oils can interfere with the new paste’s performance.
Choosing Your Application Method
There are several common methods for applying thermal paste, and the best choice often depends on the viscosity of the paste and your personal preference. The goal is to achieve an even spread across the IHS without excessive overflow.
- The Pea-Sized Dot: This is the most common and generally recommended method. Apply a small, pea-sized dot (roughly 4-5mm in diameter) of paste directly to the center of the CPU’s IHS. When the cooler is mounted, the pressure will spread the paste evenly. Avoid using too much, as it can squeeze out from the sides.
- The X-Pattern: For larger CPUs or when using thicker pastes, drawing a thin ‘X’ from corner to corner on the IHS can ensure better coverage. Again, don’t overdo the amount.
- The Five-Dot Method: Place one small dot in the center and four smaller dots around the edges of the IHS. This can help ensure coverage across the entire surface.
- Spreading (Use with Caution): Some pastes, particularly thinner ones like Noctua NT-H1, can be spread thinly and evenly with a plastic spreader (often included with kits like the Thermal Paste kit, Roller Applicator) or the back of a clean credit card. This method requires a delicate touch to avoid air bubbles. Some enthusiasts prefer this for guaranteed full coverage, but it carries a higher risk of uneven application or air pockets if not done carefully.
Mounting the Cooler Correctly
This is a critical step where the applied paste does its job. Proper mounting ensures even pressure distribution, which is key for optimal heat transfer.
- Align and Lower: Carefully align the cooler with the CPU and mounting brackets. Lower it straight down onto the CPU, avoiding any twisting or sliding motions.
- Secure Evenly: If your cooler uses screws, tighten them in a diagonal, star-like pattern. Tighten each screw a little at a time, alternating between opposite corners. This ensures the pressure is distributed evenly across the entire CPU surface. Do not overtighten, as this can damage the motherboard or CPU socket.
- Check for Wobble: Once secured, gently try to wiggle the cooler. There should be minimal to no movement.
Testing and Monitoring
After reassembling your PC and booting it up, it’s essential to monitor your CPU temperatures to ensure the thermal paste application was successful.
- Use Monitoring Software: Download and install reputable monitoring software like HWMonitor, HWiNFO64, or your motherboard’s included utility.
- Idle and Load Temps: Check your CPU temperatures at idle (when the PC is doing nothing intensive) and under load (while running a demanding game or stress test like Prime95 or Cinebench). Idle temperatures should typically be between 30-50°C, while load temperatures can range from 60-85°C depending on your CPU and cooler. Temperatures consistently above 90°C under load may indicate an issue.
- Reapplication if Necessary: If you’re experiencing unacceptably high temperatures, don’t hesitate to reapply the thermal paste. It’s better to do it again than to risk damaging your components.
Tips for Success
- Less is Often More: Starting with too much thermal paste is a common mistake. You can always add a little more if needed, but cleaning up excess paste can be messy.
- Use High-Quality Paste: Investing in a good thermal paste like Thermal Grizzly Kryonaut or Noctua NT-H2 can make a noticeable difference in temperatures, especially for high-end CPUs.
- Cleanliness is Crucial: Dust and debris can interfere with heat transfer. Ensure your workspace and components are clean.
- Refer to Your Cooler’s Manual: Always follow the specific mounting instructions provided by your CPU cooler manufacturer.
Frequently Asked Questions
How often should I reapply thermal paste?
For most users, reapplying thermal paste every 3-5 years is sufficient. However, if you notice a significant increase in CPU temperatures or if you frequently overclock your system, consider reapplying it sooner, perhaps every 1-2 years.
Can I use toothpaste or other household items instead of thermal paste?
Absolutely not. Household items like toothpaste, mayonnaise, or petroleum jelly are not designed for high-temperature applications and can actually damage your CPU or motherboard. Always use dedicated thermal paste designed for electronics.
What’s the difference between thermal paste, thermal pads, and liquid metal?
Thermal paste is a viscous compound. Thermal pads are pre-cut solid sheets that are easier to apply but can sometimes offer slightly lower performance than high-end pastes. Liquid metal offers the highest thermal conductivity but is electrically conductive and requires extreme caution during application to avoid short circuits.
How do I know if my thermal paste application is bad?
High CPU temperatures under load (consistently above 85-90°C for most CPUs), thermal throttling (where your CPU intentionally slows down to prevent overheating), or a significant increase in temperatures compared to previous benchmarks can all indicate a poor thermal paste application or a poorly mounted cooler.
Conclusion
Applying thermal paste correctly is a fundamental skill for any PC enthusiast, especially gamers who rely on their hardware for smooth, uninterrupted gameplay. By following these steps, preparing your components meticulously, choosing the right application method, and mounting your cooler with care, you can significantly improve your CPU’s thermal performance. Don’t underestimate the impact of this small but vital step in maintaining a cool, efficient, and long-lasting gaming rig.