
Key takeaways
- Clean the surface of the SSD with a microfiber cloth dipped in 90% or higher isopropyl alcohol to remove factory residues.
- Peel the protective plastic film off the first thermal pad and place it flat inside the bottom metal tray of your heatsink assembly.
- Press the bare SSD flat onto the bottom thermal pad, ensuring the gold-plated connector pins stick out completely from the end.
- Peel the plastic film off the second thermal pad and place it directly on top of the SSD’s memory chips.
- Align the top aluminum heatsink cover over the assembly and snap or screw the metal pieces together. Verify that the total thickness of the sandwiched unit does not exceed 11.25 millimeters (0.44 inches).
What's inside
Expanding your PlayStation 5 storage is one of the most rewarding hardware upgrades you can perform. As we move into 2026, game installation sizes routinely exceed 100 to 150 gigabytes, quickly exhausting the console’s built-in storage. To resolve this, Sony designed the console with an accessible M.2 expansion slot. However, high-speed PCIe Gen 4 solid-state drives transfer data at rates up to 7,450 MB/s, generating significant thermal energy in the process. Under heavy gaming loads, an uncooled SSD can quickly surpass 80 degrees Celsius (176 degrees Fahrenheit), drawing up to 6 to 9 watts of power.
Learning how to install a heatsink on playstation 5 internal ssd is critical to preventing severe system issues. If you attempt to run a high-performance drive without a heatsink, or if you install the cooling assembly incorrectly, the drive will experience thermal throttling. This protective mechanism slashes read and write speeds to keep the hardware from melting, resulting in sudden in-game stuttering, extended loading screens, and corrupted save files. In worst-case scenarios, excessive heat can permanently degrade the flash memory chips or damage the sensitive pins on the PS5’s motherboard expansion slot.
As an Amazon Associate we earn from qualifying purchases at no extra cost to you. Product prices and availability are accurate as of the date shown and are subject to change.

What You Need
Before beginning the installation, clear off a flat, well-lit workspace. You will need a few specific tools and components to ensure a safe, static-free installation process. Use the table below to gather your gear:
| Item | Why You Need It | Optional? |
|---|---|---|
| PlayStation 5 Console | The host system requiring the storage expansion. Works with both disc and digital editions. | No |
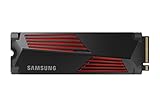
| PCIe Gen 4 M.2 NVMe SSD | Provides high-speed storage. Models like the Fanxiang 1TB ($150 to $190 price range) or the ultra-fast Samsung 990 PRO ($180 to $280 price range) are excellent choices. | No |
| Compatible Heatsink | Draws heat away from the drive controller and flash memory. (Many drives come with this pre-installed). | Yes (Only if your SSD already has a pre-installed heatsink) |
| Thermal Pads (0.5mm to 1.5mm) | Fills the micro-gaps between the flat SSD chips and the metal heatsink to transfer heat efficiently. | Yes (Typically included with aftermarket heatsinks) |
| #1 Phillips Screwdriver | Needed to remove the PS5’s metal slot cover and the tiny M.2 securing screw. | No |
| Microfiber Cloth & Isopropyl Alcohol | Cleans any fingerprint oils off the SSD chips before applying thermal pads. | Yes |
| Anti-Static Wrist Strap | Grounds your body to prevent static electricity from damaging the console’s circuitry. | Yes |
Step-by-Step Installation
Follow these steps carefully to mount your heatsink and secure your new SSD inside the PlayStation 5. This process takes approximately 20 to 30 minutes to complete from start to finish.
Step 1: Preparation and Workspace Setup (Time: 5 Minutes)
Fully power down your PlayStation 5. Do not leave it in Rest Mode. Unplug the power cable, HDMI cord, and any USB accessories. If the console has been running, let it sit for at least 15 minutes so the internal components and the main cooling fan can cool down completely. Lay a soft towel, clean microfiber cloth, or silicone work mat flat on your table. Place the PS5 down on this surface to protect the outer white plastic plates from scratches and scuffs.
Step 2: Removing the PS5 Outer Cover (Time: 5 Minutes)
Position the console so that the circular PlayStation logo is facing down and the power button is facing away from you. If you have a disc edition, the disc drive bulge should be facing upward on your top-right side. Grip the top-left corner of the white cover plate and lift it upward slightly (about a quarter-inch) while sliding the entire plate toward the bottom base of the console. The plate will slide off its locking pegs with a reassuring click, exposing the large black cooling fan and the silver expansion slot cover.
Step 3: Accessing the Expansion Slot (Time: 3 Minutes)
Locate the rectangular, silver metal cover plate situated near the cooling fan. Using your #1 Phillips screwdriver, unscrew the single screw holding this plate in place. Lift the plate away and set it aside. Inside the expansion bay, you will see a green circuit board with several screw holes marked with numbers (30, 42, 60, 80, and 110). Locate the tiny screw and the cylindrical metal spacer sitting at the “110” position. Carefully unscrew this screw, remove the spacer, and set them both aside in a small bowl so they do not roll away.
Step 4: Assembling the Heatsink and SSD (Time: 10 Minutes)
If you purchased a drive with a pre-installed heatsink, such as the Samsung 990 PRO or Fanxiang 1TB with Heatsink, you can skip directly to Step 5. If you are assembling a bare SSD and an aftermarket heatsink, proceed as follows:
- Clean the surface of the SSD with a microfiber cloth dipped in 90% or higher isopropyl alcohol to remove factory residues.
- Peel the protective plastic film off the first thermal pad and place it flat inside the bottom metal tray of your heatsink assembly.
- Press the bare SSD flat onto the bottom thermal pad, ensuring the gold-plated connector pins stick out completely from the end.
- Peel the plastic film off the second thermal pad and place it directly on top of the SSD’s memory chips.
- Align the top aluminum heatsink cover over the assembly and snap or screw the metal pieces together. Verify that the total thickness of the sandwiched unit does not exceed 11.25 millimeters (0.44 inches).
Step 5: Installing the SSD into the Slot (Time: 5 Minutes)
Place the tiny metal spacer you retrieved in Step 3 into the screw hole that matches the length of your SSD (most standard drives use the “80” position for 2280-sized drives). Hold your assembled SSD with the heatsink facing upward. Insert the gold pin connector into the PS5 expansion slot terminal at a diagonal angle of roughly 25 degrees. Push firmly until the drive is fully seated in the terminal. Gently press the tail end of the SSD down so it rests flush on top of the metal spacer. Insert the small screw you removed earlier and tighten it until snug. Do not overtighten, as you can crush the circuit board.
Step 6: Closing Up and Powering On (Time: 5 Minutes)
Place the silver rectangular expansion slot cover back over the bay and secure it using its original screw. Align the white outer PS5 cover plate with the pegs on the console body, slide it upward toward the top of the console until you hear it click firmly back into its locked position. Reconnect all power, HDMI, and controller cables. Turn on your television, power on your PS5, and follow the automatic on-screen prompt to format the newly installed M.2 SSD before your first use.
Mistakes to Avoid
Even seasoned hardware enthusiasts can make minor errors during this upgrade. Keep these critical pitfalls in mind to ensure your console remains fully operational:
- Leaving the protective film on thermal pads: Almost all thermal pads come wrapped in clear plastic film on both sides. Leaving this film on acts as a thermal barrier, trapping heat inside the SSD and causing immediate thermal throttling.
- Forgetting the metal spacer: Never screw the SSD flat against the green motherboard plate without the cylindrical spacer beneath it. Doing so bends the SSD circuit board at a severe angle, which will crack the delicate traces and destroy the drive.
- Using an oversized heatsink: Sony has strict physical clearance limits. A heatsink that is wider than 25 millimeters or taller than 11.25 millimeters will prevent the silver metal expansion cover from closing. Leaving this cover off disrupts the internal negative air pressure system of the PS5, leading to system-wide overheating.
- Stripping the tiny screws: The screws used inside the PS5 are small and relatively soft. Using a screwdriver that is too small or too large will quickly strip the screw head flat. Always use a high-quality #1 Phillips screwdriver and apply firm downward pressure as you turn.
How Often to Maintain Your SSD and Heatsink
Once your SSD and heatsink are properly installed, they require very little hands-on maintenance. It is a set-and-forget upgrade. However, because the PlayStation 5 pulls a massive volume of air through its internal chassis to cool its 350-watt power supply and custom processor, airborne dust will slowly settle over time.
Every 6 to 12 months, it is highly recommended to pop off the white plastic outer cover and inspect the expansion slot area. Use a can of compressed air to gently blow away any accumulated dust bunnies around the cooling fan vents and the edges of the metal expansion cover plate. Do not spray compressed air directly into the expansion slot if you have the cover plate removed, as this can force dust deep into the internal motherboard pins.
When to Call a Pro or Replace Your Hardware
Most gamers can complete this installation easily at home. However, there are a few scenarios where you should stop what you are doing and consult a professional electronics technician or replace your hardware:
- Stripped screw heads: If you strip the tiny M.2 screw or the expansion cover screw so badly that your screwdriver can no longer grip it, do not attempt to use pliers or drill it out. You run a high risk of slipping and scratching the delicate motherboard traces. A professional repair shop can extract the screw safely in minutes.
- Persistent thermal warnings: If your console repeatedly displays an on-screen warning stating that the system or the M.2 storage drive is overheating, turn off the console immediately. This indicates that either the thermal pads were installed incorrectly, the heatsink is loose, or the SSD controller itself is failing and drawing excessive power.
- Drive not recognized: If your PS5 powers on but fails to detect the drive after multiple attempts to reseat it, the M.2 connector pins may be damaged or the SSD itself may have suffered an electrostatic discharge. Try testing the SSD in a compatible PC, or contact the manufacturer to initiate a warranty replacement.
FAQ
Can I run an M.2 SSD in my PlayStation 5 without installing a heatsink?
No. Sony explicitly states that a heatsink is mandatory for any internal M.2 SSD installed in the PlayStation 5. High-speed Gen 4 drives generate immense heat under load. Running a drive without a heatsink will cause severe thermal throttling, resulting in degraded performance, game crashes, and a significantly shortened lifespan for your storage drive.
What are the exact maximum physical dimensions allowed for a PS5 heatsink?
The total dimensions of your SSD and heatsink assembly must not exceed 110mm in length, 25mm in width, and 11.25mm in thickness. Within that thickness, there are specific clearance allocations: up to 8mm of height is allowed above the SSD board, and up to 2.45mm of clearance is allowed below the SSD board to fit comfortably within the slot.
Do pre-installed heatsink SSDs like the Samsung 990 Pro fit without any modifications?
Yes. Premium drives designed specifically for console expansions, such as the Samsung 990 PRO with Heatsink or the Fanxiang 1TB with Heatsink, are engineered to match Sony’s exact dimensions. They can be slipped directly out of the retail packaging and straight into your PS5 expansion bay without any manual assembly or thermal pad application.
Will installing a third-party SSD and heatsink void my PlayStation 5 warranty?
No. Sony designed the PS5 with an easily accessible expansion bay specifically to encourage users to expand their storage. Opening the outer white cover plates and installing an M.2 SSD does not void your system warranty, provided that you do not damage any internal console components or tear any factory warranty seals during the process.


